May 28, 2008

Pear and Almond Frangipane Tart

Finally, my photos are up! Had been trying for days, but the photos just stubbornly would'nt want to show their apearance, even on flickr. Well well, be it pretty or ugly, I think they deserves to be up here, cos afterall, it's a sharing of my successes/failures with everyone out there, where I can improve with every new recipe that I experiment (Though I have to say there are some which I have no time to share about with all, but you may enjoy the photos if you want, but pardon for my poor photography skills! :P ).

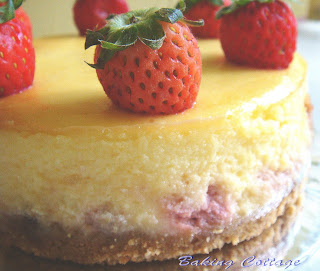
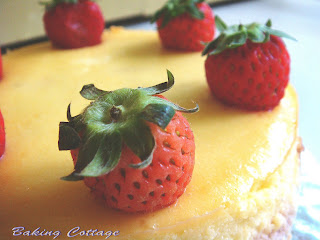
This is a lovely tart which I knew would definitely taste good even before I attempted. Buttery ground almonds crust.. reminds me of Chinese New Year almond cookies. I paired with sweet pear, though you may substitute with peaches, apples or plum.

I finally utilise the 16-cm tart shell which I bought for almost a year. :P

Ingredients:

Pastry
80g flour
20g ground almond
30g caster sugar
40g unsalted butter , soften at room temperature
1 tablespoon (15g) lightly beaten egg

Filling
85g ground almond
75g caster sugar
1/8 tsp salt
1/2 tsp vanilla extract
1/4 tsp almond extract (I omitted this)
1/2 egg
30g butter
1 pear, peeled, halved, cored, and sliced

Method:

Pastry Base
  1. Lightly grease an 16cm tart pan, set aside.
  2. Toast almond powder at 100°C for 10 mins. Stirring in between. Let cool.
    Sieve flour and almond meal. (I bought store-bought grounded almond which were too huge to pass through the sieve so i only sifted the flour).
  3. Cream butter and sugar till light and fluffy (I cream manually with spoon).
  4. Add in egg, very gradually, whisking the batter till well mixed each time the egg is added.
    Sieve over the flour/almond meal mixture in 2 to 3 additions into the batter. Fold the mixture gently with a spatula.
  5. Form and shape the pastry into a round ball.
  6. Chilled dough for at least 1 hour.
  7. Roll out the pastry in between 2 sheets of cling wrap or baking paper.
  8. Remove one side of the cling wrap or baking paper. Place it over the prepared tart pan.
  9. Mould the pastry into the tart pan, smoothing the edges and the rim carefullyChill the pastry in Use a fork to poke holes on the pastry. Brush the top of the rim with egg wash.
  10. Bake in pre-heated oven at 180°C for 10 ~12mins until the edges are slightly browned. Let cool completely.

Filling

  1. Cream butter and sugar till the mixture turns fluffy. Add in the egg gradually, mix well each time the egg is added.
  2. Add in ground almond. Fold with a spatula till well incorporated. Sieve over the flour onto the mixture. Mix with a spatula. Add in vanilla and mix well.
    Spread the filling onto the cooled pastry base. Ensure that the edges are filled up. Line with pear slices. Make sure the slices are well drained.
  3. Bake in pre-heated oven at 170°C for 30 ~ 35 mins, until the edges and filling turn golden brown.
  4. Let cool, and dust with some icing sugar if desired.

Recipe Source: Happy HomeBaking's Peach Tart (tart shell recipe) and Williams-Sonoma's Essential of Baking (recipe for the filling)

Note: I used a 16-cm tart shell and I have leftover batter. For the leftover, I made 2 more small tartlets.

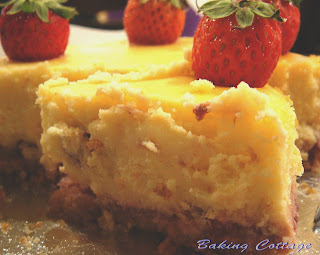
Besides the tart being too sweet, it was truly good. :D

May 20, 2008

16 May ~ From Me to You

16 May is my boyfriend's birthday. This is the first time I'm celebrating birthday with him together. :)

I baked his favourite flavour (chocolate) cake for him. Like what I usually do, I'd do a thorough research, browsed through many recipes and finally settled with Alice Medrich's Fallen Chocolate Souffle Torte. I then covered it with a layer of ganache (chocolate coating) and wrote some wordings with melted white chocolate. The wordings were quite ugly as I didn't use a proper piping nozzle. I simply filled a small bag and cut a hole through. I thought I can get creative with the wordings :P Haha...well I definitely need to practice more on that, and not to be too lazy!

Wondered what those 2 white hearts are? They were actually white chocolate modeling paste I made using glucose and melted chocolate. When hardened, it formed a dough which I could cut out shapes using cookie cutters.

Thanks to Happy Homebaker who gave me this inspiration after seeing her post - Chocolate Gateau she made for her birthday. The cake looked so gorgeous. There's no whipped cream or mousse so there won't be fear of melting when taken out of the house. :)

Fallen Chocolate Souffle Torte

Ingredients:

  • 30 g ground almonds
  • 3 tbsp all-purpose flour
  • 90 g bittersweet or semisweet chocolate, chopped fine
  • 75 g unsweetened dutch processed cocoa (I used Hershey's cocoa powder)
  • 250g sugar (I reduced to 180g)
  • 125g boiling water
  • 2 egg yolks
  • 1 tbsp brandy (I used vanilla extract)
  • 4 egg whites at room temperature
  • 1/4 tsp cream of tartar
Method:

  1. Position rack in the lower third of the oven, preheat oven to 180°C. Line and grease an 8-inch pan, 3 inches deep (I used 6-inch heart-shape pan).
  2. Combine the chopped chocolate, cocoa and 140g of the sugar in a large mixing bowl. Pour in the boiling water and whisk until mixture is smooth and chocolate is competely melted. Whisk in the egg yolks and vanilla. Set aside.
  3. Combine the egg whites and cream of tartar. Beat on medium speed until soft peaks form. Gradually sprinkle in the remaining sugar and beat on high speed until stiff but not dry.
  4. Whisk the flour and almonds into the chocolate. Fold about a quarter of the egg whites into the chocolate mixture to lighten it. Fold remaining egg whites. Scrape the batter into the prepared pan and level the top if neccessary.
  5. Bake for 30 to 35 minutes, or until a tester inserted into the centre comes out with only a few moist crumbs clinging to it.
  6. Cool in the pan on a wire rack. Torte will sink like a souffle.
  7. To remove, slide a knife between the torte and the pan and run it around the pan to release the cake completely.
  8. Serve with a light dusting of icing sugar (that's how they were served traditionally).
Recipe Source: Alice Medrich - Chocolate and the Art of Low-Fat Desserts

Chocolate Coating

Ingredients:
  • 50ml Milk
  • 50g whipping cream
  • 10g glucose
  • 200g dark / semi chocolate
Method:

Boil milk, cream and glucose, then add in the chocolate. Stir until dissolve.

Recipe Source: Phoon Huat

Note: I replaced milk with whipping cream as I did not have milk but lots of leftover whipping cream. I didn't get the glossy texture like what I saw when I attended one of Phoon Huat's workshop organised by my company a few months ago. I guess it could be the cream used in place of the milk. The coating became very thick, and lose their shine.

Chocolate modelling paste

Ingredients:

  • 190g plain dark/white chocolate, chopped
  • 3 1/4 tbsp golden syrup or liquid glucose.

Method:

  1. Melt chocolate in a heatproof bowl over a pan of simmering water. Remove from heat and beat in the syrup/glucose until mixture forms a paste that leaves the side of the bowl. Cover with cling wrap and chill for 30 minutes until firm.
  2. Remove from fridge once it's firm enough. flatten and cut out shaped using cookie cutters as desired.

Recipe Source: Fresh From the Oven: Over 70 Recipes for Delicious Home Baking by Hamlyn

Actually this is the first time I'm making modelling paste out of chocolate and not sure whether I've gotten it the correct way. After adding glucose, the find the wite chocolate doesn't taste as nice. It becomes thick and chewy, exactly like you are chewy chocolate sweets. To know more about chocolate modelling paste, you may refer to here.

I actually wanted to decorate with more hearts as there's too much modelling paste left! But I think that would look ugly and complicated. :) I lined the border with mint chocolate sticks. That was not my plan too as I had wanted to keep it simple and 'classy' with just a layer of shiny chocolate coating; but as I mentioned, the coating was too thick thus the sides were'nt smooth enough.


Someone have asked me to make known his existence. But he didn't want his face published. Oopsz! I have disclosed your age too! Know you would'nt mind one la hor :P


May 12, 2008

伟大的妈妈

It was Mother's Day yesterday and this was a simple sponge cake I made especially for my mum. I had wanted to make a mango layered sponge cake sandwich with mango slices. But I made the wrong choice of buying canned mangoes instead of fresh mangoes! :( I should not have thought of taking the easy way out. Canned peaches, longans, pineapples usually make great fruit toppings so I thought mangoes would do fine as well.

I was wrong. The canned mangoes don't taste like mangoes at all and they were too soaked up with the syrup that it had a sourish taste.It was already late at night to buy fresh mangoes. So, I seeked my mum's approval whether she's ok with making it plain and simple, by just sandwiching with blueberry jam, and dusting the top with confectioners sugar. In fact I knew the answer..LOL...cos' everytime, she would eat whatever I bake, that's how noble mums are (伟大的妈妈). :)


I used the sponge cake recipe from Happy Homebaker's basic sponge cake recipe. The cake baked beautifully, almost perfect with evenly browned surface. Mine however, was not that moist and seemed to be a little on the dry side after refrigeration even though I had brushed the layers with syrup. I guessed propably I had overbaked it. Well, something to take note of in future! Overall, the cake tasted quite delicious, my mum had it for breakfast in the morning the next day. :)


Well, I knew my mum would not be reading this but just wish to thank her for everything (beyond a few simple words that can be described here). It's not in my family's culture to express our love so openly but since she won't be seeing it, just wanna say I love you mum! *shy*

Cheers to all mums/bloggers out there, you all are such fantastic mums! :)

May 10, 2008

Sour Cream Vanilla Cupcakes & Soya Milk Chiffon

I had been lagging on my post. Although I have been baking, as i'd try to squeeze in time to bake or cook something every weekend, but I have absolutely no time to blog about it as there are so many other commitments. But whipping up some simple bakes definitely has become one of my priority. So I'd just blog about those which I feel deserves sharing or to combine two different bakes in one post. :) This sour cream vanilla cupcakes were made the day after I made the New York cheesecake for my dear friend. I had been wanting to try out this recipe using sour cream and the leftover sour cream from the cheesecake making comes in timely.

I had mentioned before that I'm on the lookout for basic vanilla cupcake recipes that would comes in handy whenever I want to make cupcakes. So this is yet another recipe I have 'conquered'.

The result was simply so good! It was very soft, fluffy, rich without being too dense like a pound cake. Of course if you were to compare with the low-fat vanilla cupcake, it's much more "unhealthier". I had opted for the full fat version of the sour cream as I do not want to try one recipe without realising it's full potential if I cut down on the fat. But I believe light sour cream should do fine too, probably not as rich.

I brought a batch for my colleagues and was happy that everyone came back to me with a word of thanks that the cupcake was yummy! Do try it if you happen to have sour cream, you'll have no regrets!

Ingredients:

  • 120g sifted cake flour
  • 1/4 tsp salt
  • 1/4 tsp baking soda
  • 1/8 tsp baking powder
  • 90g unsalted butter, softened at room temp
  • 180g granulated sugar (I reduced to 140g)
  • 1 1/2 tsp vanilla extract
  • 1 large egg
  • 125ml sour cream

    Method:
  1. Preheat oven to 180°C.
  2. Line muffin pan with paper muffin liners.
  3. Sift together cake flour, salt, baking soda and baking powder. Set aside.
  4. Cream the butter and sugar until light and fluffy, about 2 minutes. Add vanilla extract and beat for 1 minute. Scrape down the sides of the bowl. Add the egg and beat until smooth, about 1 minute.
  5. Using a rubber spatula, fold in one-third of the flour mixture.
  6. Fold in half of the sour cream. Repeat ending with the last third of the flour mixture.
  7. Fill prepared muffin liners to approximately three-quarters full (I filled it almost to the top unless you are making cupcakes).
  8. Bake until light golden brown and cupcake springs back when lightly pressed, about 20-25 minutes.
  9. Cool in pan for 5 minutes then transfer to cooling rack.
Recipe Source: Alphineberry's vanilla cupcakes


-------------------------------------------------------------------------------------------------


I happened to buy some soya milk that day and decided to bake a soya milk chiffon. I always like to drink soya milk and was wondering how would the taste be like for a soya milk chiffon. I used a basic vanilla chiffon cake recipe but changed the milk to soya milk. Disappointingly the soya milk taste was not distinct at all. :( It tasted quite plain like a normal egg sponge cake. I believe a basic vanilla chiffon would taste much better because of the addition of vanilla essence and milk.

Nevertheless, here's the original recipe which you may like to try.

Ingredients:

  • 4 large egg yolks
  • 60g milk
  • 60g canola oil (any vegetable oil will do)
  • 60g caster sugar
  • 1g salt
  • 120g cake flour
  • 3g baking soda
  • 0.5g vanilla essence
  • 4 large egg whites
  • 2g cream of tartar
  • 70g caster sugar

Method:

  1. Sift cake flour and baking soda. Set aside.
  2. Whisk egg yolks with a wire whisk. Add in milk, oil, 60g sugar and salt and mix until all the sugar has dissolved.
  3. Add in sifted flour mixture into the egg yolk mixture. Mix until a smooth batter is formed.
  4. In a clean dry bowl, using an electric beater, beat egg whites with cream of tartar added in.
  5. Add in the 70g sugar in 3 separate additions. Beat until soft peaks formed.
  6. Continue beating until stiff peaks form (egg whites should form a peak which curls slightly).
  7. Fold 1/3 of the beaten egg whites into the egg yolk batter and mix throughly but gently. Mix the remaining egg whites into the batter until well incorporated.
  8. Pour batter into 8-inch chiffon tin.
  9. Bake at 180°C for about 30-35 minutes.
Recipe Source: 西点篇 01 by 陈明里


Actually I'm still wondering if my chiffon can be considered a success. Everytime after unmoulding, I found that the interior is rather moist. The top part usually shrank immediately after taking out of the oven, which subsequently caused the chiffon to be a little "deformed" after overturning it. I would say it's not firm and sturdy enough. Guess I must continue to keep on practising!!


May 3, 2008

A Special Dedication

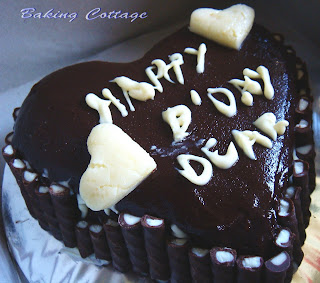
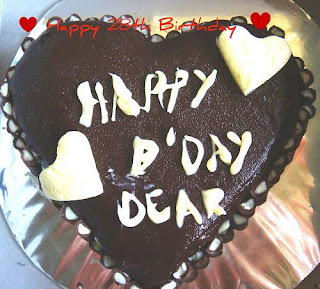
I remember how in my young days, I love to visit bakeries and admired those beautifully decorated fresh cream cakes on display, wishing my birthday would be coming so that I would be able to request a birthday cake. In those days, the designs seemed to be rather standard, or I woud call old fashioned in today's context! haha...I don't know if there were actually mouuse cakes back then. I guess there was? Cos' I only knew about mousses, ganache...etc when I started baking. Likewise, many of those who don't bake don't know either. So I guess they should have existed in bakeries for a long time.

I still remembered that was this cake shop in my neighbourhood area with glass window where I could peeped in to see the bakers at work, piping and decorating cakes with fresh cream; and dreaming I would one day be able to make a birthday cake on my own. Till then, it was only like a dream to me; just like those childhood ambition of becoming a teacher, doctor... owning a BIG bookshop...yes that was one of my ambition, cos' I love to visit bookshops and wished I had all the cute stationeries.

Ok, coming back to baking, never would I have thought that it's not a dream at all! It has come true for me! With a bit of passion, patience, not being afraid of failure, keep trying and trying..I'm so happy that I've already tried baking birthday cakes for my dear ones...Though I won't say it's as good as those sold outside, I made it with my whole heart and I would want to continue to improve.

This dear friend of mine, one of my bestest friend, had been lamenting that I had not baked her a birthday cake for her yet. So I promised her that this year, I'm gonna bake her one. I chose to bake her favourite - a rich, sinful new york cheesecake. There are millions of cheesecake recipes...and I chose this because it has sour cream added, as I knew she liked her cheesecake to taste more sourish instead fof sweet.

I had wanted to add some raspberries to make a raspberry cheesecake. But I could not find any raspberries; instead when I visited the hypermart that day, some korean strawberries were on sale! They were much smaller than the ones I usually see, so they were just nice for decorating the cheesecakes :)

Yeah, there you are!


This recipe does not have any flour, so I guess probably that's the reason it does not form any cracks on top. I'm so happy that the surface was so smooth and shiny..:) In fact it forms a reflection, due to it's shiny top. It also does not involve any steam-baking.

It was not that firm though after slicing it as I had baked it on the same day I brought it out, thus it wasn't chilled enough.

Ingredients:

200g digestive biscuits, crushed
50g unsalted butter, melted
900g cream cheese (I used Philedelphia)
Pinch of salt
300g caster sugar
250ml sour cream
2 tsp vanilla extract
1 tbsp finely grated lemon zest
1 tbsp lemon juice
4 eggs, beaten
2 egg yolks
Some Strawberries (optional)

Method:

  1. Preheat oven to 150°C. Grease a 23-cm springform tin fitted with a flat base.
  2. In a bowl, mix together the biscuit crumbs and melted butter, then press mixture evenly into the base of the prepared tin. Bake in the oven for 10 minutes, or until lightly browned. Remove from the oven and set aside to cool.
  3. In a separate bowl, beat cream cheese until soft and smooth. Add the salt, and sugar and beat for 1 minute.
  4. Add sour cream, vanilla extract, lemon zest and lemon juice and beat for a further 1 minute. Finally add the eggs and egg yolks and beat until well combined.
  5. Add some chopped strawberries into the cream mixture. (I did not add too much as I only wanted to be able to bite into some strawberries. It should not overpower the taste of cheese, hence this is optional.
  6. Lined biscuit base with chopped strawberries, spread some strawberry jam over it (optional).
    Pour the mixture evenly over the biscuit base in the tin.
  7. Bake for 45-50 minutes, until the edges are set but the centre is slightly soft.
    Turn off the oven, leave the cheesecake inside andleave the door ajar. Leave to cool in the oven for 45 monutes.
  8. Remove cheesecake from oven and cool to room temperature. Remove from tin, cover with foil and refrigerate for at least 4 hours, preferably overnight, before serving.

    Note: I reduced the recipe by a quarter of it (I divided everything by 4), cos' I only used a small 5-inch pan. Thankfully it worked fine. :)

    Recipe Source: Cakes Galore by Valerie Barrett - This book was given to me by this birthday gal and it's the first recipe that I tried. ;)

    Yeah...here's your favourite cheesecake especially for you my dear! Happy Birthday gal!